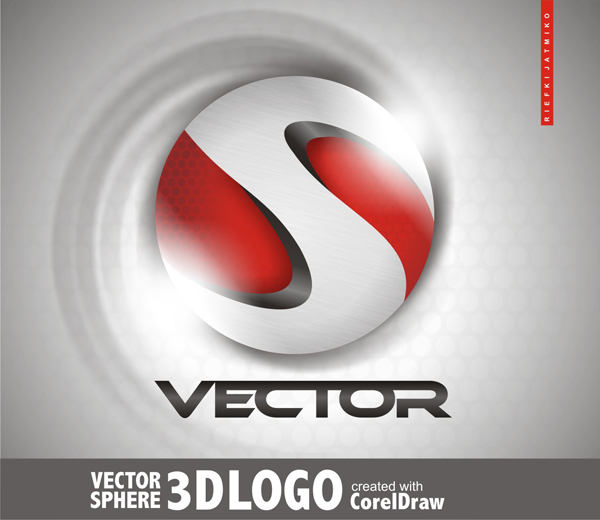
Tutorial to Create a Logo and a 3D Effect with CorelDraw (all versions 11.12, x3, x4, x5, x6, x7)
The logo is an important thing that must be owned by a company or a community, because the logo is a characteristic which makes it easy to menginggat. When we find a logo for example in the form of such roadside

we go back to the initial topic of the tutorial to create a logo and a 3D effect with CorelDraw (all versions 11.12, x3, x4, x5, x6, x7) so not too dizzy let us consider the same as this little DIRECTLY TO scene.
1. MATERIAL MATERIAL
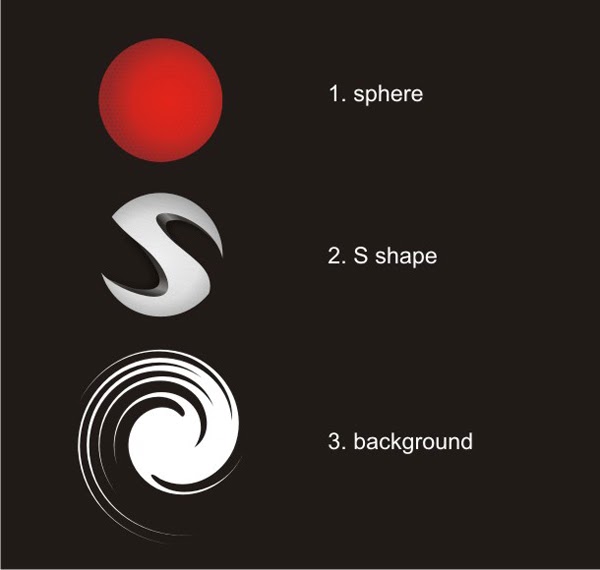
First of all you must use CorelDraw with version 11+. In this tutorial I use CorelDraw X4. Okay let's get started. Let's look at the basic elements used to create our design:
1. ball
2. The "S" shape
3. Background
First of all you must use CorelDraw with version 11+. In this tutorial I use CorelDraw X4. Okay let's get started. Let's look at the basic elements used to create our design:
1. ball
2. The "S" shape
3. Background
2. make Worksheet
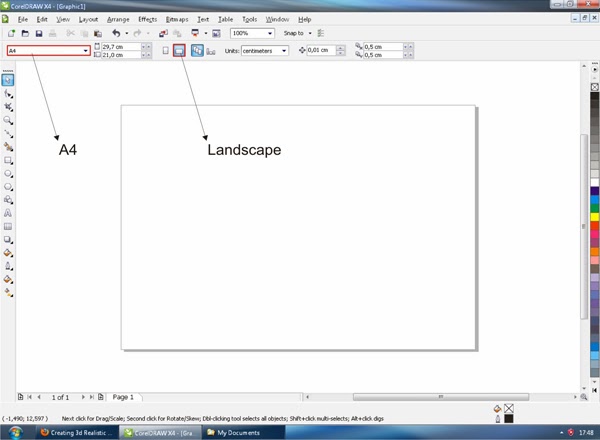
First of all open your CorelDraw program. Now create a new file and set the paper size A4 landscape.
First of all open your CorelDraw program. Now create a new file and set the paper size A4 landscape.
3: Creating Circles Create
circle using the Ellipse Tool. Find em on the left toolbar. Set to 7x7 cm.
circle using the Ellipse Tool. Find em on the left toolbar. Set to 7x7 cm.

4: Create Box Create a box
Using the Rectangle Tool find em in the left toolbar. Make a box with a size of 8.3 x 8.3 cm. Select both squares and circles, then make the center width using the keys C + E.
Using the Rectangle Tool find em in the left toolbar. Make a box with a size of 8.3 x 8.3 cm. Select both squares and circles, then make the center width using the keys C + E.
5: Convert to CurvesSelect the box using the Pick tool in the toolbar on the left first. Then converted into a curve box using Command + Q, or go to the top toolbar and then find Arrange> Convert to Curves. This will allow you to edit a node or a frame box. After that go to the Shape Tool. This is the second on the left toolbar, and click em. Now you will see a box node.6: Creating NodesUsing the Shape Tool to add 6 node to the box by double-clicking the line of the box, with the position below.7: Dragging NodesSelect a node in the middle of the attraction - the left and use the Shape Tool. This applies also to the right node. Drag them into the middle of the indicated position.8: Convert to CurvesIt
is still using the Shape Tool Left-click the line between the nodes
that have been dragging, and turn it into a curve using Rows Convert to
Curves. It's in the top toolbar, until you see two arrows in the row. This applies also to all lines between the node that has been dragging.9: Creating the "S" ShapeIt is still using the Shape Tool Left - click on the arrow at the node and you can pull them, it will make a curved shape. Pull em shape until it looks like an "S" shape.10: Paint the "S" Shape
Now the box is formed such as "S" letters. Now let's put the colors so they will look a little metal. Select "S" shape. Go to the Fountain Fill Tool, which is at the bottom left of the toolbar. Select Custom fill on the color blend and make the type Radial. Now you'll see the color box. You can change the color by clicking the left, fill color with 50% Black on the left and white on the right. You can create a custom fill by double-clicking on the color box. Fill color to 50% black in the middle left and white on the right middle. Two custom colors in the middle will make a softer color gradients.
If you do it right it will look like this.11: Colour CircleNow we will work with the ball. Left click a ball, and go to the Fountain Fill Tool to color. Once you open the Fountain Fill Tool, select Custom color mixture, and makes Radial Type. Fill the left side of the box color with Dark Red Color. You can make this by clicking on others in the bottom left of the color palette. Set to deep red by dragging. And fills the right side with the normal red color, this will create a gradient that goes from dark to bright red.and will be12: PowerclipAfter that we will put an "S" shape into balls with Powerclip tool. Left - click on "S" shape, and then go to the top toolbar and find Effect> Powerclip> Place Inside Container. Then you will see a black arrow, left - click em to the ball, and now you will see that the type of "S" is in the sphere. You can go "inside" or "outside" the container by pressing Command while double-clicking.
Step 13: Editing Inside ContainerOkay that is getting more interesting right. Now we will edit in the container, ie the ball. Hold down Command while double licking balls and now you are in the container. Creating custom boxes in the container, and shape it.
Step 14: Edit Custom ShapeNow we'll color Custom Shape you have created. Go to the Fountain Fill Tool, which is at the bottom left of the toolbar. Select Custom fill on the color blend and make the type of Linear. Now you'll see the color box. You can change the color by left-clicking it. Fill color with Black on the left and right. and you can create a custom fill by double-clicking on the color box, fill color with Black in the middle of the left, right and center, and 50% Black in the middle. Use a 45 degree angle.Do this on both the Custom Shapes.Send Two of the Custom Shape to the bottom layer by selecting them and pressing Command + Page down.Step 15: Adding texture to the form SAnd now we are going to add a little texture to the "S" shape. I made this in Photoshop, so I will not explain it here. It is available in file 'source' thoughOK, now import the metal texture into your working file by pressing Command + IClick Metal Texture and Placing it in the "S" shape of the container using Powerclip (see step 12 for information about the process). Now if you do it right, you will see something like this.Here is the view from the outside of the container.Step 16: TransparencyNow we have two containers Container Sphere and the "S" shape of the container. Now the "S" shape of the container will have the texture, but it was still too dark, so let us alleviate them a little. Into the "S" shape of the container by holding Command while Double-click. In the "S" shape of the container and the metal texture Click to go to the Interactive Transparency Tools, it is in the lower left toolbar. We will make metal texture slightly transparent, in the Interactive Transparency Tools toolbar to go to the upper left. There you will see the kind of transparency, set into uniform. While still in the Interactive Transparency Tools, you will see the tool set point of transparency, making the value of 80.If you do it right, it will look something like this from outside the container.Step 17: Creating ShadowNow we will add a little shadow to custom forms in the container ball, which gives an aura with the ball. Sphere entered into the container by pressing Command + Click twice, and then select two black custom form. Once you choose them, finding Shadow Interactive Tool, which is at the bottom left of the toolbar. After that, you will notice that your cursor turns into a box, hold down and drag them to create shadows.Apply this on the custom form, and will look something like this from the outside of the container.Step 18: Applying Texture RacingNow we will apply the texture to the ball Racing. In the file 'source' you will find racing - texture.cdr. Import it into your working document.Now we will put texture into a red sphere. Choose a texture and put it in a container with Powerclip Sphere (process described in step 12).Sphere in Containers put texture on the bottom layer by pressing Command + Page Down. After that go to the Interactive Transparency Tool and set the type of uniform and set the transparency value to 80.If you do it right, it will look like on the outside of the container.
Step 19: Creating the BackgroundNow we will create a background for the ball. Create a rectangle or square to the background color to a darker color or gray - it's up to you. Custom fill, as in step 11. Send the background to the bottom by pressing Command + Page Down.After it was put into the shadow of the ball using the Shadow Interactive Tool (see step 17).Now we will leave the ball for a while. Now create a star shape using the Star Tool, which is located in the left toolbar. Left click and drag it into your document to create a star. On the top toolbar you will see the value of the polygon to a star. Apply a value of 8 to make the star 8 corner.Once you make a star go to Tools Distortions in the left toolbar. When you click on the top toolbar will appear Distortion Type, set to "Distortion. Now grab stars, by holding and dragging the Left - click, and create a circle clockwise to move to distort the star.Background texture shape we finished, now put color in it (color) and apply a swirl to the ball.
Step 20: Making light
We will make the light, which would give an aura ball. Now make small balls with the size you want, as long as it is smaller than a red ball. Use the Ellipse Tool to make it, and put color in it as you like.Now create a shadow for the small environment using Shadow Interactive Tool, then drag it to the big red sphere. Instead of creating a black shadow now we will make the white shadow, the shadow opacity set to max, Shadow Feathering to 62, and the Shadow Color to White.You can separate the shadow and a small circle by pressing Command + K. Duplicate white light and you will have the results below.thustutorial to create a logo and a 3D effect with CorelDraw (all versions 11.12, x3, x4, x5, x6, x7) may be an inspiration to us all


i love this
ReplyDeletegood work...keep it up Corel Draw X3
ReplyDelete
ReplyDeleteThis is a splendid web journal! I'm exceptionally content with the remarks!
3D Interior Design